1、爬虫简介
使用selenium模块获取起点中文作品书架作品排行,并打印相关的排行信息。
2、站点分析
需要爬取的内容
VIP收藏榜共5页,每一页展示的有20条排名数据,爬取完每一页的数据之后,自动点击下一页爬取,我们需要获取的内容有:
- 排名
- 书名
- 作者
- 收藏

3、代码实现
# coding=utf-8
from selenium import webdriver
import time
from selenium.webdriver.support import expected_conditions as EC
from selenium.webdriver.support.wait import WebDriverWait
from selenium.webdriver.common.by import By
from urllib.parse import urljoin
from selenium.common.exceptions import NoSuchElementException
class VipCollection:
def __init__(self):
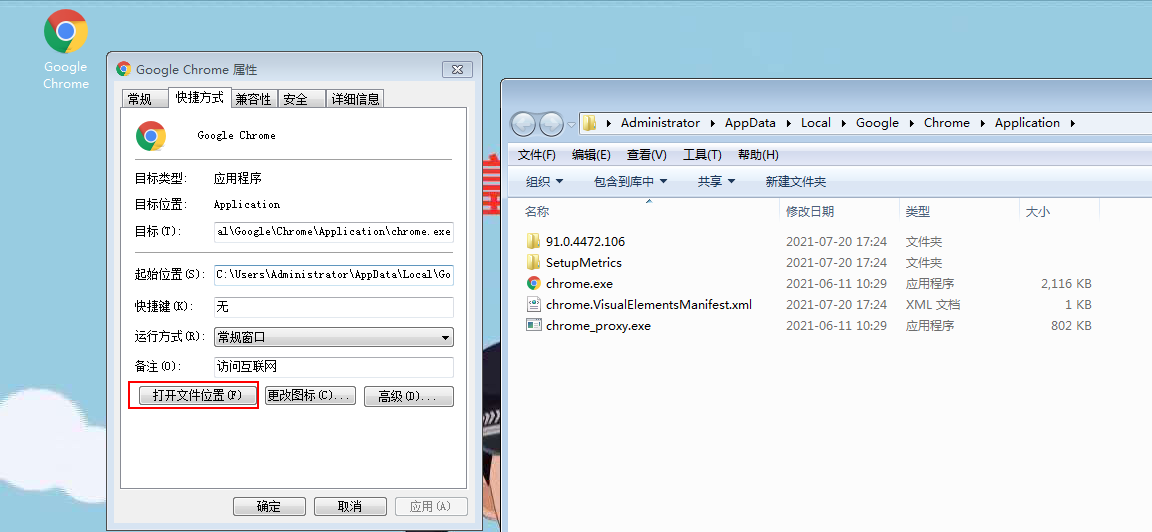
self.driver = webdriver.Chrome(
executable_path=r"C:\Users\Administrator\AppData\Local\Google Chrome\Chromebin\chromedriver.exe")
self.start_url = "https://www.qidian.com/rank/vipcollect?style=1&page=1"
# 打开VIP收藏榜网页
def start(self):
self.driver.get(self.start_url)
self.driver.maximize_window()
def page_request(self):
try:
wait = WebDriverWait(self.driver, 10) # 设置网页加载超时时间10s
wait.until(EC.presence_of_element_located((By.CLASS_NAME, 'rank-body'))) # 等待页面排行数据被加载完成
lis = self.driver.find_elements_by_xpath('''//*[@class='book-img-text']/ul/li''') # 小说排名列表信息
# 解析列表信息,获取小说名称、url、排名、收藏数
for li in lis:
data_rid = li.get_attribute('data-rid') # 直接获取li标签的data-rid属性,即每一页的排名1,2,3,4...20
page = int(self.driver.current_url.split('page')[-1][1:]) # 获取页码
rank = (page - 1) * 20 + int(data_rid) # 因为每一页的排名都是1、2、3、4、5...20,所以我们需要给排名进行计算
name = li.find_element_by_xpath("./div[@class='book-mid-info']/h4/a").text # 获取小说名称
author = li.find_element_by_xpath("./div[@class='book-mid-info']/p[@class='author']/a[@class='name']").text # 获取小说作者
href = li.find_element_by_xpath("./div[@class='book-mid-info']/h4/a").get_attribute('href')
detail_url = urljoin(self.start_url, href) # 对url进行自动拼接,得到完整的小说详情url
collection = li.find_element_by_xpath("./div[3]/div/p/span/span").text # 获取收藏数
print({'rank': rank, 'name': name, "author":author, 'detail_url': detail_url, 'collection': collection})
# 定位下一页按钮,尝试点击元素直到最后一页
try:
pagenation = self.driver.find_element_by_xpath(
"//ul[@class='lbf-pagination-item-list']/li/a[@class='lbf-pagination-next ']")
if pagenation:
pagenation.click()
self.page_request() # 请求自己对页面进行解析
# 下一页元素不存在就捕获异常,并结束
except NoSuchElementException:
print('已经是最后一页,等待5秒结束......')
except Exception as e:
print(e)
# 等待5秒关闭浏览器
def close(self):
time.sleep(5)
self.driver.close()
if __name__ == '__main__':
top = VipCollection()
top.start()
top.page_request()
top.close()
代码执行过程…

4、字体加密分析
从上面的代码执行结果我们可以看到,打印结果的collection书籍收藏数都是乱码的,是因为字体被加密的缘故,我们无法直接获取加密后的内容,这个在网页的源代码中也可以看出来,如下所示:

我们打开浏览器网页的源码,发现对应的是这串代码
<p><span><style>@font-face { font-family: mflgGAGq; src: url('https://qidian.gtimg.com/qd_anti_spider/mflgGAGq.eot?') format('eot'); src: url('https://qidian.gtimg.com/qd_anti_spider/mflgGAGq.woff') format('woff'), url('https://qidian.gtimg.com/qd_anti_spider/mflgGAGq.ttf') format('truetype'); } .mflgGAGq { font-family: 'mflgGAGq' !important; display: initial !important; color: inherit !important; vertical-align: initial !important; }</style><span class="mflgGAGq">𘠧𘠥𘠣𘠪𘠫𘠪𘠡</span></span>收藏</p>
代码直接解析出来就是下面这个:
𘠧𘠥𘠣𘠪𘠫𘠪𘠡收藏
猜测𘠧𘠥𘠣𘠪𘠫𘠪𘠡这一串字符以分号分隔,更好对应7位,解密之后会不会就是我们需要的收藏数?
5、字体解密
源码中返回的是编码后的数据。
解决方案:
将字体下载下来,转换成xml,然后分析源码数据和xml数据之间的对应关系。起点网中:源码的十进制,对应的是xml中map标签的code属性值的十六进制。
5.1 获取字体文件并解析为xml
字体文件一般是xxx.woff,并解析为xml文件,fontTools为第三方库,使用前请先安装pip install fontTools
# coding=utf-8
import requests
from fontTools.ttLib import TTFont
import time

headers = {
    "User-Agent": 'Mozilla/5.0 (Windows NT 6.1; WOW64) AppleWebKit/537.36 (KHTML, like Gecko) Chrome/69.0.3497.100 Safari/537.36'
}


def get_woff(url):
    response = requests.get(url, headers=headers)
    with open('font.woff', 'wb') as f:
        f.write(response.content)


def parseToXml(file):
    f = TTFont(file)
    f.saveXML('font.xml')


if __name__ == "__main__":
    url = "https://qidian.gtimg.com/qd_anti_spider/mflgGAGq.woff"  # url
    file = r"C:\Users\Administrator\PycharmProjects\Test\selenium_test\font.woff"
    get_woff(url)
    time.sleep(2)
    parseToXml(file)
woff文件对应路径是上面提到的这个路径:

5.2 十进制字符转化为十六进制
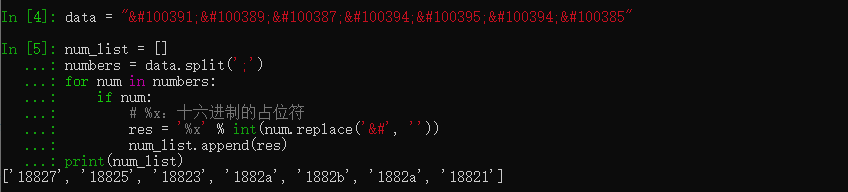
10进制字符𘠧𘠥𘠣𘠪𘠫𘠪𘠡转化为16进制
data = "𘠧𘠥𘠣𘠪𘠫𘠪𘠡"
num_list = []
numbers = data.split(';')
for num in numbers:
if num:
# %x:十六进制的占位符
res = '%x' % int(num.replace('&#', ''))
num_list.append(res)
print(num_list)
10进制字符进行转化之后,得到这样一个7位十六进制数的列表
5.3 根据十六进制数据反查xml文件字典
[‘18827’, ‘18825’, ‘18823’, ‘1882a’, ‘1882b’, ‘1882a’, ‘18821’]
解析的xml文件中的部分内容如下:

我们可以看到18827对应name='six’也就是数字6,18825对应name=‘nine’也就是数字0…
所以列表[‘18827’, ‘18825’, ‘18823’, ‘1882a’, ‘1882b’, ‘1882a’, ‘18821’]对应的就是数字[6,0,5,8,1,8,2],拼接起来就是6958182,对应的就是这个收藏数据了

6、最后
完整的代码我就不贴了,这里只是展示一个字体解析的思路,加密必然对应一个密码本,密码本(xml)我们已经得到了,把加密的内容解密出来就相对容易了,至于怎么解析xml标签结构,请求网页源代码,提取出字体文件woff,这里我就不赘述了,感兴趣的小伙伴可以自己去研究下…喜欢的点个赞吧~!