2019独角兽企业重金招聘Python工程师标准>>> 
看到 博客的文章,里面 opencv 很早以前发的东西,发现 怎么看 都不完整 看起来很别扭,于是今天我加上一篇 教程 关于 opencv 的grabcut简单的图像分割算法 ,这个在很多 图像爬虫中 然后需要对图像分割 处理 符合我们需要的图片时候 很有用 ,下面 我们来测试测试。
这个opencv 后续 我会推出opencv怎么使用opencv自带的ML机器学习算法,在手机端,有时候用不了那么多机器学习库,用opencv 也是一个很好的方式,使用opencv 来做移动端的一些简单的机器学习
这里我就简单说一下 简单的方式 怎么做到的吧。很简单 。大家如果 有下面类似的 从图片抓取的 分割出图像出来的需求 ,可以直接使用这种方式。
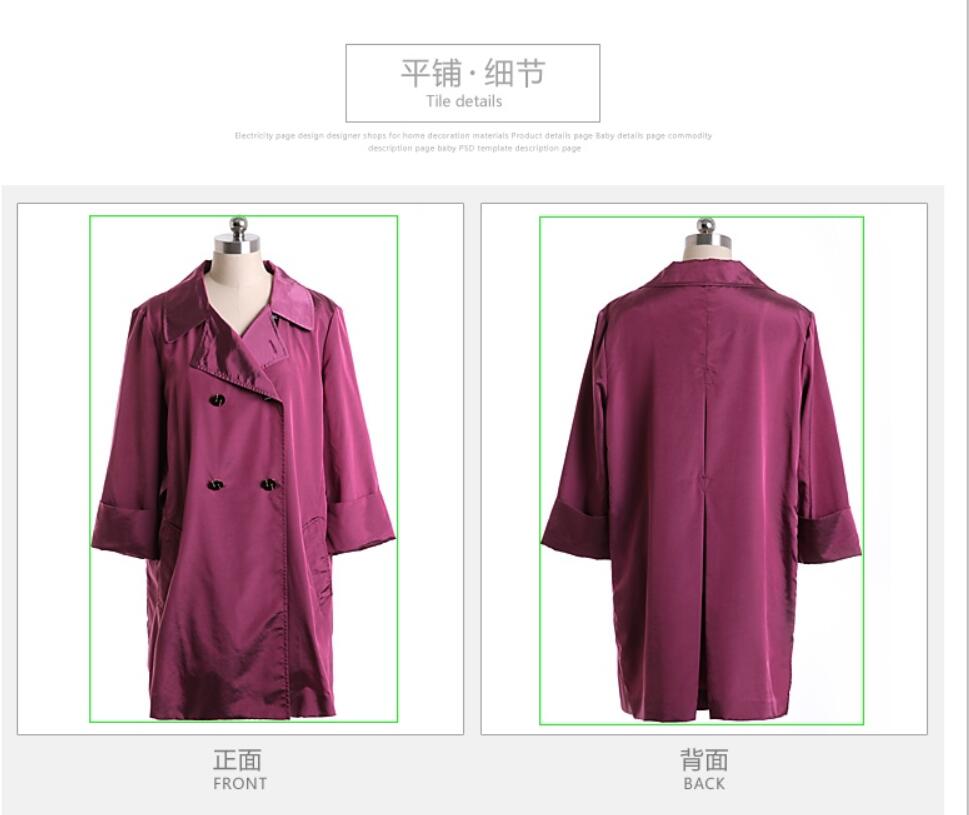
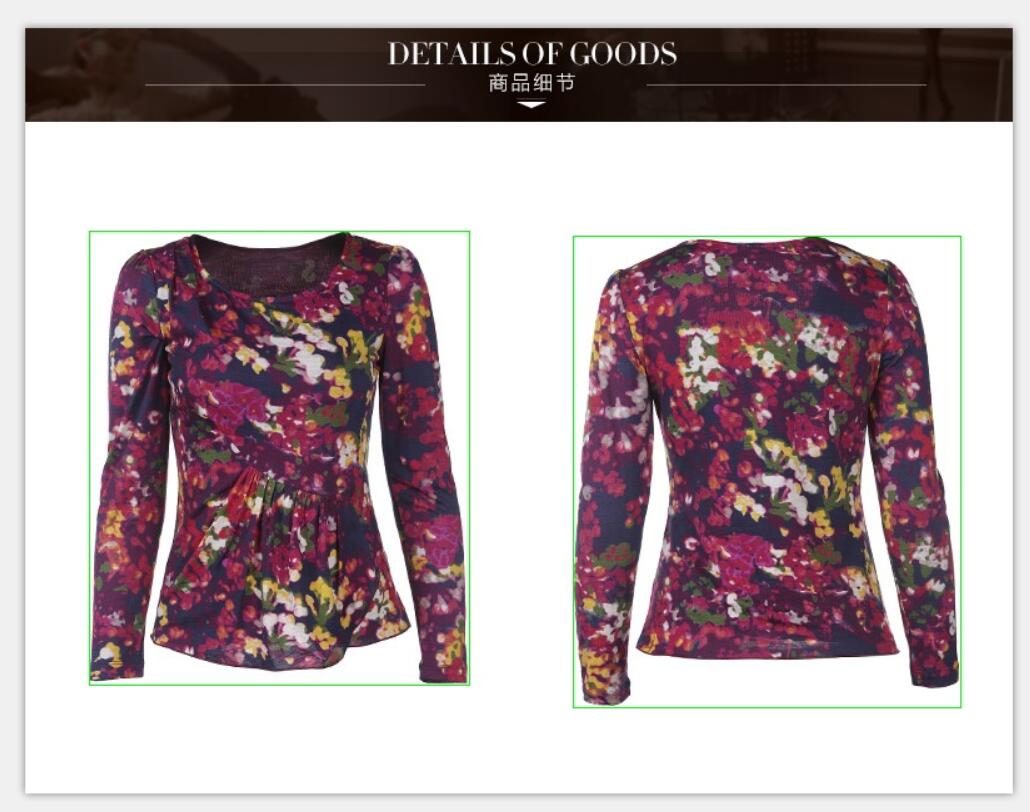
下面是 需要被处理的图片,我们有个场景,抓取了好多淘宝图片 ,但是我们只需要单品图片,过滤掉背景 ,我们只需要那最重要的那部分图片保存起来,这样我们app 上展示 就是我们的商品图片了

下面 第一部分 是grabcut算法 的核心 代码
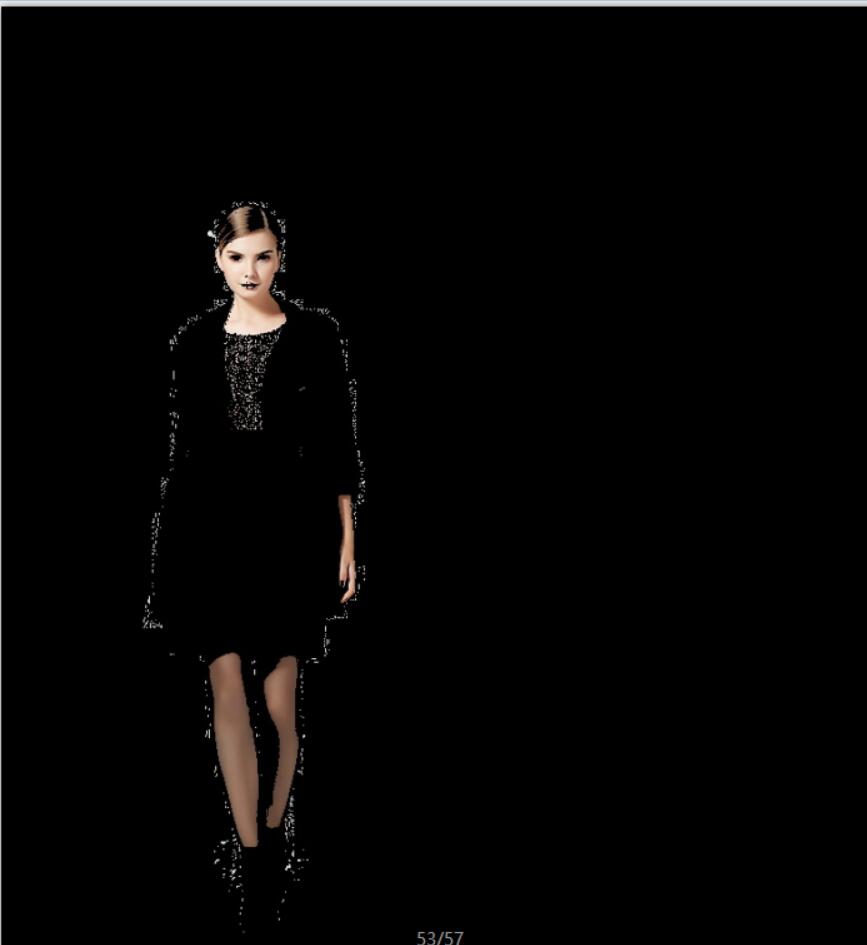
过程 分别是 首先转为灰度 color2gray 然后使用ostu算法得到阈值 ,然后高斯模糊 使得减少噪音,然后查找轮廓contours 最后 从轮廓中找到最大的轮廓 。这里 有模特的图片 所以 加了一部分皮肤侦测
  public static BufferedImage grabcut(Mat  src){
		Mat thr = new Mat();
		Imgproc.cvtColor(src, thr, Imgproc.COLOR_BGR2GRAY);
		// Imgproc.THRESH_BINARY + Imgproc.THRESH_OTSU
		 Imgproc.GaussianBlur(thr, thr, new Size(3, 3), 0);
		// http://docs.opencv.org/master/d7/d4d/tutorial_py_thresholding.html#gsc.tab=0
		Imgproc.threshold(thr, thr, 0, 255, Imgproc.THRESH_BINARY
				+ Imgproc.THRESH_OTSU); // Threshold the gray
		// Imgproc.adaptiveThreshold(imgGray, imgThreshold, 255,
		// Imgproc.ADAPTIVE_THRESH_GAUSSIAN_C, Imgproc.THRESH_BINARY, 11, 2);
		List<MatOfPoint> contours = new ArrayList<MatOfPoint>(); // Vector for
		// adaptiveThreshold(gray, result, 255, ADAPTIVE_THRESH_MEAN_C,
		// THRESH_BINARY, 15, 40);
		// double mean = Core.mean(image).val[0];
		// Imgproc.GaussianBlur(imageMat, imageMat, new Size(3, 3), 0);
		// Imgproc.threshold(imageMat, imageMat, 0, 255, Imgproc.THRESH_OTSU);
		// cvSmooth(imageMat, imageMat, CV_MEDIAN, new Size(3, 3), 0);
		// Imgproc.adaptiveThreshold(imageMat, imageMat, 255,
		// Imgproc.ADAPTIVE_THRESH_MEAN_C, Imgproc.THRESH_BINARY, 5, 4);
		Mat h = new Mat();
		double largest_area = 0;
		int largest_contour_index = 0;
		Rect bounding_rect = new Rect();
		Imgproc.findContours(thr, contours, h, Imgproc.RETR_CCOMP,
				Imgproc.CHAIN_APPROX_SIMPLE); // Find the contours in the image
		for (int i = 0; i < contours.size(); i++) // iterate through each
		{
			double a = Imgproc.contourArea(contours.get(i), false); // Find the
			if (a > largest_area) {
				largest_area = a;
				largest_contour_index = i; // Store the index of largest contour
				bounding_rect = Imgproc.boundingRect(contours.get(i)); // Find
			}

		}
		int width=bounding_rect.width;
		int height=bounding_rect.height;
		if(largest_area==0||width<160||height<160){
			//没有轮廓不做处理
			return OpenCVUtil.matToBufferedImage(src);
		}else{

		int x1=bounding_rect.x;
		int y1=bounding_rect.y;
		int x2=x1+width;
		int y2=y1+height;
		Point tl=new Point(x1, y1);
		Point br=new Point(x2, y2);
		return grabcut(src,tl,br);
		}

    }

    public static BufferedImage grabcut(Mat img,Point tl,Point br){
       Mat background = new Mat(img.size(), CvType.CV_8UC3,
               new Scalar(255, 255, 255));
       Mat firstMask = new Mat();
       Mat bgModel = new Mat();
       Mat fgModel = new Mat();
       Mat mask;
       Mat source = new Mat(1, 1, CvType.CV_8U, new Scalar(Imgproc.GC_PR_FGD));
       Mat dst = new Mat();
       Rect rect = new Rect(tl, br);
       Imgproc.grabCut(img, firstMask, rect, bgModel, fgModel,
               5, Imgproc.GC_INIT_WITH_RECT);
       Core.compare(firstMask, source, firstMask, Core.CMP_EQ);
       Mat foreground = new Mat(img.size(), CvType.CV_8UC3,
               new Scalar(255, 255, 255));
       img.copyTo(foreground, firstMask);
       Scalar color = new Scalar(255, 0, 0, 255);
       Core.rectangle(img, tl, br, color);
       Mat tmp = new Mat();
       Imgproc.resize(background, tmp, img.size());
       background = tmp;
       mask = new Mat(foreground.size(), CvType.CV_8UC1,
               new Scalar(255, 255, 255));
       Imgproc.cvtColor(foreground, mask, Imgproc.COLOR_BGR2GRAY);
       Imgproc.threshold(mask, mask, 254, 255, Imgproc.THRESH_BINARY_INV);
       Mat vals = new Mat(1, 1, CvType.CV_8UC3, new Scalar(0.0));
       background.copyTo(dst);
       background.setTo(vals, mask);
       Core.add(background, foreground, dst, mask);
       firstMask.release();
       source.release();
       bgModel.release();
       fgModel.release();
       vals.release();
       //Highgui.imwrite("/root/grabcut.jpg", dst);
       return OpenCVUtil.matToBufferedImage(dst);
	}
下面看看 我怎么写的
public class SkinDetectTest2 {


	static {


		 System.loadLibrary(org.opencv.core.Core.NATIVE_LIBRARY_NAME);
	}
	private static List<File> getFiles(String fileName) {
	    File file=new File(fileName);
	    return Lists.newArrayList(file.listFiles(new FilenameFilter() {

			@Override
			public boolean accept(File dir, String name) {
				if(name.endsWith(".jpg")||name.endsWith(".png")){
					return true;
				}

				return false;
			}
		}));

	}

	  public static void main(String[] args) {

		  List<File> files=getFiles("c:/mnt");
			for (File file : files) {
				  Mat image=Highgui.imread(file.getAbsolutePath());
				  System.out.println(image.width()+"*****************"+image.height());
				  //YCrCbSkinDetector cbSkinDetector=new YCrCbSkinDetector();
				  SkinDetection detection=new SkinDetection(image);
				  //Mat result=cbSkinDetector.detectSkin(image, cbSkinDetector.ycrcbMin, cbSkinDetector.ycrcbMax);
				  Mat skin=detection.GetSkin();//960
				  Highgui.imwrite("c:/mnt/result/"+file.getName()+"skin1.jpg", skin);
				  System.out.println(skin.width()+"======="+skin.height());
				  Mat thr = new Mat();
					Imgproc.cvtColor(image, thr, Imgproc.COLOR_BGR2GRAY);
					// Imgproc.THRESH_BINARY + Imgproc.THRESH_OTSU
					 Imgproc.GaussianBlur(thr, thr, new Size(3, 3), 0);
					// http://docs.opencv.org/master/d7/d4d/tutorial_py_thresholding.html#gsc.tab=0
					 double testmean = Core.mean(skin).val[0];//1
					Imgproc.threshold(thr, thr, testmean, 255, Imgproc.THRESH_OTSU );//Imgproc.THRESH_OTSU); // Threshold the gray// Imgproc.THRESH_BINARY
					  //+ Imgproc.THRESH_OTSU
					// Imgproc.adaptiveThreshold(imgGray, imgThreshold, 255,
					// Imgproc.ADAPTIVE_THRESH_GAUSSIAN_C, Imgproc.THRESH_BINARY, 11, 2);
					List<MatOfPoint> contours = new ArrayList<MatOfPoint>(); // Vector for
					// adaptiveThreshold(gray, result, 255, ADAPTIVE_THRESH_MEAN_C,
					// THRESH_BINARY, 15, 40);
					// double mean = Core.mean(image).val[0];

					// Imgproc.threshold(imageMat, imageMat, 0, 255, Imgproc.THRESH_OTSU);
					// cvSmooth(imageMat, imageMat, CV_MEDIAN, new Size(3, 3), 0);
					// Imgproc.adaptiveThreshold(imageMat, imageMat, 255,
					// Imgproc.ADAPTIVE_THRESH_MEAN_C, Imgproc.THRESH_BINARY, 5, 4);
					Mat h = new Mat();
					double largest_area = 0;
					int largest_contour_index = 0;
					Rect maxbounding_rect = new Rect();
					Imgproc.findContours(thr, contours, h, Imgproc.RETR_CCOMP,
							Imgproc.CHAIN_APPROX_SIMPLE); // Find the contours in the image
					List<Rect> rects=Lists.newArrayList();
					for (int i = 0; i < contours.size(); i++) // iterate through each
					{


						Rect bounding_rect = Imgproc.boundingRect(contours.get(i)); // Find
						int width=bounding_rect.width;
						int height=bounding_rect.height;
						int x=bounding_rect.x;
						int y=bounding_rect.y;
		                if(contours.size()>1&&(x<10||y<10)){
							continue;
						}
						double a = Imgproc.contourArea(contours.get(i), false); // Find the
						if (a > largest_area) {
							largest_area = a;
							largest_contour_index = i; // Store the index of largest contour
							maxbounding_rect = Imgproc.boundingRect(contours.get(i)); // Find
						}
						if(width>150&&height>150){
					    double wh= (width/(height*1.0));
						//if(wh>1.7) continue;//过滤掉长宽高相差很远的
						//System.out.println(width+"=========="+height+"============="+bounding_rect.x+"==================="+bounding_rect.y);
						Point tl=bounding_rect.tl();
						Point bl=bounding_rect.br();
						System.out.println(tl+"============"+bl+"==========="+width+"=============="+height+"################"+wh);
						Core.rectangle(image, new Point(bounding_rect.x, bounding_rect.y), new Point(bounding_rect.x + bounding_rect.width, bounding_rect.y + bounding_rect.height),
						        new Scalar(0, 255, 0));
						rects.add(bounding_rect);
						}
					}
					System.out.println(maxbounding_rect.width/(maxbounding_rect.height*1.0)+"####################"+maxbounding_rect.tl()+"---------------"+maxbounding_rect.br()+"-----------------"+maxbounding_rect.width+"------------"+maxbounding_rect.height);
		            double maxwh=maxbounding_rect.width/(maxbounding_rect.height*1.0);


					//			Core.rectangle(skin, new Point(bounding_rect.x, bounding_rect.y), new Point(bounding_rect.x + bounding_rect.width, bounding_rect.y + bounding_rect.height),
//					        new Scalar(0, 255, 0));
				  // Mat newsrc=ImageUtils.grabcutMat(image,maxbounding_rect);
//		          for (Rect rect : rects) {
//		        	    int width=rect.width;
//						int height=rect.height;
//						int x=rect.x;
//						int y=rect.y;
//						if(rects.size()>1&&x<10&&y<10) continue;
//
//				  }
				  Highgui.imwrite("c:/mnt/result/"+file.getName()+"roi.jpg", image);
				  YCrCbSkinDetector cbSkinDetector=new YCrCbSkinDetector();
				  Mat result=cbSkinDetector.detectSkin(skin, cbSkinDetector.ycrcbMin, cbSkinDetector.ycrcbMax);
				  double mean = Core.mean(result).val[0];//1
				  System.out.println("=============="+mean);//mean 为0 或者 接近<2 没有脸
				  Highgui.imwrite("c:/mnt/result/"+file.getName()+"skinresult"+mean+".jpg", result);
				  //0.6 1 1 2
			}


//		  @Override
//		    public Image filter(Image input) {
//		        Mat outputMat = new Mat();
//		        Mat inputMat = input.getData();
//		        Mat inputMatGreyscale = new Mat();
//		        Imgproc.cvtColor(inputMat, inputMatGreyscale, Imgproc.COLOR_RGB2GRAY);
//		        fastNlMeansDenoising(inputMatGreyscale, outputMat, 5, 13, 21);
//		        input.release();
//		        inputMatGreyscale.release();
//		        Image output = new Image(outputMat);
//		        return output;
//		    }


	}
import org.opencv.core.Core;
import org.opencv.core.CvType;
import org.opencv.core.Mat;
import org.opencv.imgproc.Imgproc;

//program adapted from http://bytefish.de/blog/opencv/skin_color_thresholding/
public class SkinDetection {

	Mat inputImage;

	public SkinDetection(Mat image){
		this.inputImage = image;
	}


	public boolean ruleRGB(int R,int G, int B){
		boolean value1 = (R>95) && (G>40) && (B>20) && ((Math.max(R,Math.max(G,B)) - Math.min(R, Math.min(G,B)))>15) && (Math.abs(R-G)>15) && (R>G) && (R>B);
		boolean value2 =(R>220) && (G>210) && (B>170) && (Math.abs(R-G)<=15) && (R>B) && (G>B);
		return (value1||value2);
	}

	public boolean ruleHSV(int H, int S, int V){
		return (H<25) || (H> 230);
	}

	public boolean ruleYCrCb(int Y,int Cr, int Cb){
		 	boolean value1 = Cr <= 1.5862*Cb+20;
		    boolean value2 = Cr >= 0.3448*Cb+76.2069;
		    boolean value3 = Cr >= -4.5652*Cb+234.5652;
		    boolean value4 = Cr <= -1.15*Cb+301.75;
		    boolean value5 = Cr <= -2.2857*Cb+432.85;
		    return value1 && value2 && value3 && value4 && value5;
	}

	public Mat GetSkin(){
		//Important to load this line, it calls in the Native Library
		 System.loadLibrary(Core.NATIVE_LIBRARY_NAME);

		Mat outputImage = inputImage.clone();


		Mat srcYCrCb = inputImage.clone() , srcHSV = inputImage.clone();

		//Convert the image into YCrCb and HSV ranges.
		Imgproc.cvtColor(inputImage, srcYCrCb, Imgproc.COLOR_BGR2YCrCb);
		inputImage.convertTo(srcHSV,inputImage.type());
		Imgproc.cvtColor(srcHSV, srcHSV, Imgproc.COLOR_BGR2HSV);
		//Normalize the values for HSV
		Core.normalize(srcHSV,srcHSV,0.0,255.0,Core.NORM_MINMAX,inputImage.type());
		double zero[] = new double[]{0,0,0};

		for(int row =0; row< inputImage.rows();row++){
			for(int col=0; col<inputImage.cols();col++){
				//fetch values in the respective color space
				 double pixel[] = inputImage.get(row, col);
				 double pixelYCrCb[] = srcYCrCb.get(row, col);
				 double pixelHSV[] = srcHSV.get(row, col);


				 int B = (int)pixel[0];
				 int G = (int) pixel[1];
				 int R = (int) pixel[2];
				 boolean resultsRGB = ruleRGB(R, G, B);

				 int Y = (int) pixelYCrCb[0];
				 int Cr= (int) pixelYCrCb[1];
				 int Cb= (int) pixelYCrCb[2];
				 boolean resultsYCrCb = ruleYCrCb(Y, Cr, Cb);

				 int H = (int)pixelHSV[0];
				 int S = (int)pixelHSV[1];
				 int V = (int)pixelHSV[2];
				 boolean resultsHSV = ruleHSV(H, S, V);

				 if(!(resultsRGB && resultsYCrCb && resultsHSV  )){
					 outputImage.put(row,col,zero);
				 }

			}
		}


		return outputImage;
	}

}
下面 看看运行结果

这里 是打印的轮廓 X Y坐标位置 大小 以及 长宽比 ,这个可以用来调节排除过滤 一些不符合条件的图片
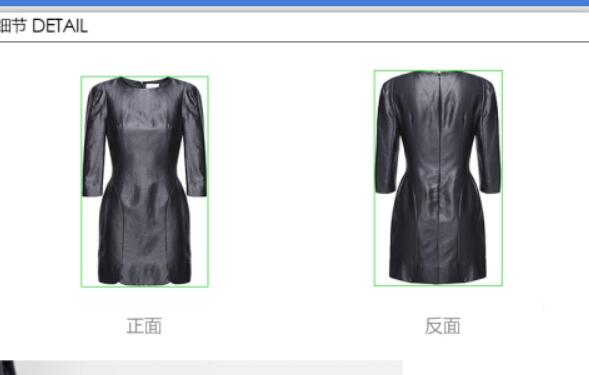
下面看看 输出结果
这在之前 ,指出一段代码 ,这段代码 是画一个框 颜色是sclaar 0 255 0 也就是 是绿色,正常环境 把它换成subimage截取图像就可以了 ,因为宽高 x y 起始位置我们都知道 。
Core.rectangle(image, new Point(bounding_rect.x, bounding_rect.y), new Point(bounding_rect.x + bounding_rect.width, bounding_rect.y + bounding_rect.height),
						        new Scalar(0, 255, 0));
下面 贴出结果 注意 看我们绿色 画框框的地方 Core.rectangle